Showing posts with label sugar-free. Show all posts

Tuesday, March 5, 2019

What's for Dinner Tonight?{Gluten and Dairy Free} Enchiladas

I love these enchiladas. The sauce takes just a little time, but makes a double batch so you can freeze half of it for another night. You will thank yourself when you discover it's all ready to go! I am posting this on Allergy-free Wednesdays here. They have great recipes shared! I hope you get to take a look! For vegan options you can put black beans, rice, corn, and/or green chilis inside instead.

Enchilada Sauce

1 TBS olive oil
1 TBS garlic powder (or 2 cloves garlic crushed)
1 TBS onion powder (or 1/2 onion chopped)
1 TBS cumin
2 TBS mild chili powder
4 TBS gluten free flour (I use a gluten free mix here, or garbanzo)
4 cups chicken broth
1 (8 oz) can tomato sauce (I use a small can of tomato paste plus 1 can water)
salt to taste

1. Mix spices and flour in olive oil in saucepan over medium heat until fragrant and starting to brown.
2. Slowly add the chicken broth and tomato sauce and cook and stir until thickened. (15 or so minutes). Add salt to taste.
This makes a double batch of sauce. Label and freeze half of it.

Other ingredients:
Shredded cooked chicken
diced avocado
chopped green onion
chopped red pepper
chopped tomatoes
cilantro
daiya cheese
brown rice tortillas
dairy free sour cream (Tofutti, Vegenaise, or  So Delicious Coconut yogurt).
salsa
(green salsa is dynamite on this!)
black olives

Directions:
Pour some of the sauce in the bottom of the 9 x 11 pan to make a thin layer. I take Trader Joe's or Food for Life tortillas, and freeze them in the freezer. Take tortillas out one by one and dip them in the hot enchilada sauce for 5 seconds (holding on to the top outside of the sauce with your fingers). Take them out and lay them in the pan.Put 1/2 cup of cooked shredded chicken down the middle. Roll them up with the seams down. Repeat until you have a pan full of enchiladas. Sprinkle with daiya cheese and chopped olives (if desired). Baked at 450F until warmed through. (15 minutes or so) and "cheese" is melted. While it is cooking I shred the lettuce, chop tomatoes, chop green onions, chop cilantro, cut avocado into chunks, and make guacamole (combining smashed avocados with some salsa in a ratio of 2/3 avacado to 1/3 salsa). We also like to put diced red peppers on top. Serve the enchilada with piled toppings on top. I like to use vegenaise instead of sour cream on top.

Since half of this is frozen, it means  you have an easy dinner just waiting to happen. I put the frozen tortillas in the freezer and heat them from frozen so they are ready to go. I make my own chicken broth in the crockpot (go here) and then freeze the chicken in two portions. I thaw one of the portions and the sauce. . . . walla! Dinner in no time!


Friday, February 17, 2017

Soy-free, Sugar Free, Citrus-free Teriyaki Chicken

This is the kind of recipe you gobble down before you even think about taking a photo. Thanks again to Rachel Ray, I tried her amazing teriyaki recipe (found here). She said it was the most downloaded recipe of 2011. She made hers in the crockpot. I made it in a pan at the last minute with chicken breasts.

8 chicken legs, thighs attached (I used chicken breasts when cooking in a frying pan)
3 TBS cornstarch (or potato starch if you can't have corn)
salt and pepper
Extra Virgin Olive Oil
1 bottle teriyaki sauce (see my recipe below)
3 TBS ginger grated or 3 tsp dry
3 cloves garlic grated or minced
3 TBS honey
6 scallions, white and green parts sliced on the bias, but kept separate
2 cups rice
2 cups water
1 TBS sesame seeds, toasted (I omitted these)
1 red bell pepper, cut into matchsticks
1 cucumber, cut thin into matchsticks
1 large carrot, cut thin into matchsticks
3 TBS cilantro
optional: 1 small bundle of broccoli cut into pieces

Teriyaki Sauce
2/3 cup chicken broth and salt (originally soy sauce)
1/4 cup pomegranate juice (originally sherry)
2 TBS maple sugar
1 tsp ground ginger
1 clove garlic
(adapted from all-recipes.com)

Preparation
In a large bowl (I use a plate) dust the chicken with cornstarch and season with salt and pepper. Heat medium sized skillet over medium high heat with about 1 TBS of EVOO and brown the chicken legs (if you are cooking in a pan cook it until almost done on a slightly lower heat)

In a slow cooker, add the browned chicken legs along with the teriyaki sauce, ginger, garlic, honey and white parts of the scallions (I added this to the pan when the chicken was almost done when cooking it on the stovetop). Put the lid on and cook on low for 5 hours or high for 3 hours. When the chicken is about 20 mintues away from being down, add the rice, water, 2 TBS of EVOO and salt to a medium sized pot with a lid. (I started the rice first, and added the other teriyaki type ingredients to my pan of chicken when the chicken was almost done and let simmer for 5 minutes or so).

Bring the pot of rice up to a boil, then drop it down to a simmer. Put the lid on and simmer for 10-15 minutes. When the rice is done, fluff with a work and fold in the green parts of the scallions and sesame seeds (I omitted them). I have found the greatest secret of rice on the stove top is don't lift the lid! Jasmine rice is my favorite.

To serve, place the rice on a plate, put the chicken and sauce drizzled over the top with cucumber, carrot, cucumber and red pepper in a nice pile on top of that. Sprinkle with cilantro. I lightly sauteed some broccoli with the carrot to put on top as well. I seem to tolerate cooked carrots better than raw ones).It was fantastic! I usually can only handle one serving of left overs after a meal before I'm done with a meal for awhile. I enjoyed eating this for days! I also add hot pepper flakes on top since I love spice.

Wednesday, October 12, 2016

My Favorite {Gluten and Dairy Free} Sugar Free Oatmeal Cookies


Photo by Christina Weedon
I want to take note of this website where I found these (here). I can imagine many other yummy goodies coming from here. I made these recently. Ok, maybe I ate them for breakfast. And why not? They have oats, bananas, raisins and no refined sugar. They are like granola in a cookie. I made half of my batch with raisins and the other with Enjoy Life chocolate chips. We at the raisin ones for breakfast and the chocolate chip ones for dessert (after breakfast). You should have seen my child's eyes light up when I broke the news of what we were having for breakfast. There were SO delicious. I was surprised at how easy they were to whip up. We snuck down to my husband's office at lunch time to surprise him with some. These cookies brought a lot of happiness into an ordinary day.  They beyond a doubt just became a staple at our house. As I was eating the first cookie I was already thinking about getting ingredients for my next batch. The only thing I would change is to make a double batch and freeze half as I usually do!

Ingredients:
3 Cups Gluten Free Oats {I used two cups old-fashioned, and one cup quick-cooking.}
1 1/2 Cups Gluten Free All-Purpose Flour
1/2 tsp. Xanthan Gum
1/2 tsp. Cinnamon
1/2 tsp. Baking Soda
1/4 tsp. Salt
1 Cup Maple Syrup {the real stuff!}
1/2 Cup Oil {grapeseed, canola, another neutral oil}
1 tsp. Vanilla
1 1/2 Well-Mashed Bananas {for very small bananas, use two... very large, maybe just one.}
1/2 Cup {or so} Mix-In's, such as raisins or other dried fruit, nuts, chocolate... 

Directions:
Combine oats, flour, xanthan gum, cinnamon, baking soda, and salt. Stir thoroughly.
To the flour mixture, add maple syrup, oil, vanilla, and mashed bananas. Mix well to combine.
Add your mix-ins, and don't be afraid to experiment! This batch used raisins and just a few mini chocolate chips. {Keep in mind that some mix-ins may add a touch of sugar to the recipe.}
Place rounded spoonfuls of dough on parchment-lined baking sheets and bake at 375 degrees for about ten minutes, until the edges are golden and cookies have a nice 'puff' to them.
Allow to cool for a few minutes on the baking sheet, then transfer to a wire rack.

Note: this is a sticky, messy dough! Don't be alarmed {I was!}, the cookies will bake up nicely and with a dense, chewy texture.  

Friday, June 24, 2016

Vegan, Soy-free, Gluten Free Protein Powder

During a time when I was having a tough time working in enough calories with my limited diet a friend gave me this amazing suggestion. It is Nutribiotic vegan Protein powder. It is allergy friendly and full of protein made from brown rice. This became a great supplement to get me through the day. I would have a smoothie for breakfast and one before bed.  What's not to love about a smoothie? This was great to take on the road, too. If I was at someone's house I could easily have this for breakfast. Sometimes I would have cereal and this, or granola and this, first thing in the morning. It goes well with bananas and a milk substitute or apple juice (don't forget the ice!).  If you are changing your diet by eliminating a bunch of foods, this might be your ticket to switching without going totally crazy.  It was just the extra thing I needed to have on hand in a pinch. You can buy it in a 21oz or a 3lb size.  Go here to get yours. This is what Amazon has to say about it.

"NutriBiotic Rice Protein Vegan, Vanilla 80% Protein Content Hypo-Allergenic GMO & Gluten Free NutriBiotic vanilla flavored Rice Protein is a great tasting vegetable protein made from non-genetically modified whole grain sprouted brown rice. Free of the common food allergens normally associated with soy, milk, egg, wheat, and corn. This highly soluble powdered formula mixes easily into water, juice, or meals for an extra protein boost. Chemical processing is avoided by using a purified water and natural enzyme procedure. Low Temperature Enzyme Process The whole brown rice is first ground into a fine flour. Pure filtered water is then added, forming a thick slurry (called liquefaction) Natural enzymes are added in at different stages to break down and separate the carbohydrate and fiber from the protein portion of the whole grain. All processing temperatures are kept below 90° F. The low temperature and chemical free processing prevents denaturing of the amino acids. The final stage involves filtering, drying and low temperature milling."

Wednesday, May 11, 2016

What's for Dinner Tonight?{Gluten and Dairy Free} Chicken Mini Pot Pies


Right out of the oven
Thanks to Rachel Ray, I got this great idea to make mini pot pies. They were so cute and gave a little pizzaz to a long day. If you want a lower maintenance dinner you can omit the crust and put mashed potatoes on top. Then broil until golden on top. (this is one of my favorite ways to do it) If you want REALLY low maintenance you can take the filling, and just put it over gluten free toast. Even this can make dinner fun.  VEGAN OPTION: If you are vegan the vegetables are so colorful, and the sauce so flavorful I think it still makes a great meal. Just skip the chicken, use vegetable broth and maybe add broccoli or asparagus in small pieces! I will be sharing this recipe on Allergy-free Wednesdays here. Take a gander! There are tons of recipes and I bet you will find something interesting!

this is the filling cooking
Prep Time: 35 minutes
Cook Time: 40 minutes
Serves 6-8
 Filling:
1TBS extra virgin olive oil
2/3 cup chopped carrots
1 zucchini julienne sliced
1/4 white onion chopped
1 large clove of garlic chopped.
2 and 1/2 cups chicken broth
1/4 cup gluten free flour blend (see ratio below) or garbanzo flour
salt and pepper to taste
1 TBS dried thyme
2 cups chicken cooked and chopped or shredded


2 and 3/4 cup all purpose flour plus more for dusting (I use the ratio: 1 cup brown rice to 2/3 cup tapioca to 1/3 cup potato starch and 1/2 tsp xanthan gum)
1/2 tsp salt
1 1/3 cups chilled palm shortening 2/3 cup ice water

For pastry:
I used just a little too much flour on my board so it broke up a little!

In a food processor pulse together the flour and salt. Add the shortening and pulse until coarse crumbs form about 10 seconds. Pour in ice water and pulse until the dough comes together and the water is fully incorporated about 30 seconds. Divide into two equal pieces, wrap each in plastic wrap and flatten into a disk, freeze until firm (about 15 minutes)
But we still enjoyed them in spite of the broken crust.

For the filling:
Saute the carrots, onion, garlic and zucchini  and the olive oil over medium heat in a frying pan until softened. Add the chicken broth. Take the GF flour and just enough water to make it a little runny. Stir well with a fork. When it is a thick liquid add it to the frying pan. Stir well continually over med low heat until the sauce thickens. Add thyme, salt and pepper to taste, as well as the chopped chicken. Heat it through. As with everything getting the salt and pepper right seems to make this dish. I forgot to taste mine before putting it in the pies and had to add more salt later.

Pre-heat the oven to 400F. Take the pastry and roll it out on a cutting board or counter top sprinkled lightly with GF flour.  When it is thin like a pie crust cut it into squares. Grease the muffin pan well with olive oil. Take the squares and press them in the muffin tin. Vary the size depending on the size of your muffin tin. I did jumbo muffins so I made my squares large. The square when pressed in the muffin tin should come to the top of the muffin tin. Add a scoop of the filling mixture. Put a smaller square on top of the filling. Crimp the edges like a pie. Poke with a fork. Brush with olive oil (or egg if you can). Bake at 400F until golden on top. For the jumbo muffins it was about 15 minutes.

Monday, May 9, 2016

What's For Dinner Tonight?{Gluten and Dairy Free} Porcupines


When I married my husband this is something that came with the package.  .  .his love for a dish his mother makes affectionately called "porcupines" (due to the rice poking out of the balls of meat like quills). I adapted it for our GF lifestyle (it originally uses Cambell's tomato soup). My kids cheer whenever we make it.

I am posting this on a group called Allergy-free Wednesdays at glutenfreelyfrugal.com this week (here). For more recipe ideas, you should check it out!

Porcupines 
1-1.5 lbs ground beef
1 small can of tomato paste
1/2 cup uncooked rice
2 TBS onion chopped or dried onion
salt and pepper

Mix ground beef, rice, salt, pepper and onion in a medium bowl. Form into small balls like meatballs and put in a saute pan. Turn on medium. Put tomato paste and 1 can of water into another bowl and stir. Pour over porcupine balls. Sprinkle with salt and pepper. Put a lid on. Reduce heat to medium low and let simmer for 15-20 minutes until they are cooked through.  We serve these with mashed potatoes (using olive oil and chicken stock instead of milk and butter), and oven roasted broccoli.

Monday, March 21, 2016

Gluten-free, Dairy-free, Egg-free French Toast


My husband figured out the secrets of french toast for me, and I am beyond grateful. I tend to buy Trader Joes bread or make bread and then freeze it.  You just put a frozen slice in a plate with 1/4-1/2 inch rice milk (or other milk sub) and 1/2 tsp or so cinnamon. Nuke it for 30 seconds. Turn it over and nuke it again for 30 seconds. Let it sit for a minute. If your bread is not frozen just let it sit in the milk mixture for 30 seconds, flip it over, and let it sit for 30 seconds more (and skip the nuking). Meanwhile, get a pan really hot with coconut oil or grapeseed oil in it. Turn the heat to medium when you add the bread. Turn it over when golden brown. I cover mine with real maple syrup, and berries or bananas. It comes out soft on the inside and crispy on the outside.  I don't even miss the real thing.

Friday, February 19, 2016

(Gluten and Dairy Free} Honeydew-Cucumber-Mint Popsicles

photo from www.nourishingmeals.com

Popsicles made out of wholesome foods? Sugar free? Wow. They did it again on one of my favorite blogs Nourishing Meals here. Check it out! Here is what she says, 


I like to use a very ripe honeydew melon for this recipe. You could also add the juice from one to two limes for a refreshing tart flavor. If you don't have very many popsicle molds, I would suggest using either a small melon or half a melon and a medium cucumber. You could also add ice cubes to any leftovers that won't fit into the molds and make a refreshing smoothie. Please note that this recipe is also suitable for all phases of the Elimination Diet!

1 medium to large honeydew melon, seeded
1 large cucumber, chopped
1 large handful fresh spearmint leaves

Cut the melon in half, scoop out the seeds, and then scoop out the flesh into a bowl to catch the juices. Add the melon and juices to a blender orVita-Mix. Then add the chopped cucumber and fresh mint. Blend until smooth. Pour into popsicle molds. Freeze overnight. Source: www.NourishingMeals.com

Wednesday, February 10, 2016

EASY {Gluten and Dairy Free} Colorful Alfredo Pasta

My kids and husband devoured this. It's like a colorful chicken alfredo. I wanted to record it and share it before I forgot it! I posted this here at allergy free wednesdays. It's a fun recipe round up!
5 boneless skinless Chicken breast strips
1 roma tomato diced
1 bunch of asparagus (you may use cooked broccoli or peas instead)
3/4 package of brown rice pasta (I choose Trader Joe's GF spaghetti noodles for this recipe)
6 slices of bacon cooked and crumbled (I use Farmland brand)
3 cloves garlic (finely diced or pressed with a garlic press)
salt and pepper
3/4 tsp dried basil or 3/4 TBS chopped fresh basil
GF  flour mix (I like to use  the ratio: 1 cup brown rice to 2/3 cup potato to 1/3 cup tapioca)
rice milk (I use unsweetened Kirkland brand)
flat leaf (italian) parsley to garnish (if desired)


Saute chicken until done in a sauce pan with a little bit of olive oil, salt and pepper. Put the water on to boil for the pasta and the asparagus. Grab both ends of the asparagus and bend it (like you are trying to snap it). Where it naturally breaks is where the hard part stops. Save the ends with the leafy tops, and throw out the hard stems leftover. When water comes to a boil, boil the asparagus for about 3 minutes. (turn down heat to med-low after it is in the pot). Remove and set aside. Meanwhile, start the white sauce. Add 2 TBS olive oil and the garlic to 4 TBS GF rice flour in a saucepan. Stir until it is a paste. Put over a medium-low heat. Slowly add a little rice milk and stir. Wait until it thickens. Add a little more rice milk. Keep doing this for 5-7 minutes until you have a nice sauce consistency. Add the basil, chopped tomatoes and cooked crumbled bacon. Stir in the cooked chicken (cubed into 1 inch pieces). Cook the pasta as directed. For the secrets to rice pasta go here. Combine white sauce, asparagus, bacon, tomato, rice pasta and chicken until well combined. Season with salt and pepper to taste (I add a little extra salt to make up for it not being cheesy. But since there is bacon, I'd be careful to not over do it!) Garnish with flat leaf parsley or regular parsley if desired. 

Tuesday, January 19, 2016

The Best {Gluten, Dairy, Sugar Cane Free} Chocolate Cake

photo from Nourishing Meals
Here is the recipe for the cake that I love. No eggs, dairy, sugar, gluten, nuts. . . what's in this thing? Go find it at Nourishing Meals. The photo is from their site. One of my favorite blogs!

The arrowroot powder I have found is way cheaper at Manna Mills in the herb jar section, but Freddies has it. I use grapeseed oil instead of coconut oil, pomegranate juice instead of the apple cider vinegar,and don't put the beet juice or almond extract in the frosting.

Even my gluten-tolerant family likes this cake.

Wednesday, January 13, 2016

What's for Dinner Tonight? Lime-in-the-Coconut Drumsticks

This comes from Rachel Ray's latest magazine. I made this the other day and was pleasantly surprised. I bet you could sub pomegranate juice for the lime if you have a citrus sensitivity. This gave the chicken SO much flavor, and left quite a memorable impression.

3 garlic cloves crushed
3 TBS chopped ginger
1 cup chopped scallions, white and green parts
1 cup cilantro
1/4 tsp cayenne pepper (I left this out for my spice timid family, and added red pepper flakes to mine later)
1/3 cup honey
1 cup coconut milk
1/3 cup lime juice plus 1 tsp grated zest
10 skin on chicken drumsticks

In blender, combine all ingredients except chicken; puree. Cut 2 deep slits in each drumstick; marinated in coconut mixture, at least 1 hour. Transfer chicken to rack placed on foil lined baking sheet; season. Bake at 450F for 20 minutes; flip and bake until cooked through, 10 minutes. Serves 6.

royalty free photo
I would suggest serving this over jasmine rice, garnished with scallions, cilantro and toasted sesame seeds. And serving oven roasted broccoli (in olive oil) on the side.

Wednesday, October 7, 2015

{Gluten and Dairy Free} Berry Smoothie

My recent discovery of So Delicious Coconut Yogurt is nothing short of sensational.  It is the secret ingredient in this smoothie. After not having yogurt for over 6 years, this was a happy day.

2/3 cup frozen mangoes
1 and 1/2 cups water
1 banana
1 small container passionate fruit mango coconut yogurt
5 raspberries
1 cup frozen blueberries (I buy them from costco. They are so plump and ripe!)

Blend with a little ice in your blender. You can add additional sweetener if you'd like, but this was plenty for us. I was thinking this would be great with Trader Joe's mango ice cream instead of the mangoes, too!

Monday, May 26, 2014

Experiments in the Kitchen- Part 4

I posted these recipes earlier and finally had a chance to make them.

1.Cinnamon Swirl Pancakes here. I made them with granulated maple sugar and egg replacer. I skipped the icing and they were still crazy sweet. I found that they truly tasted like flat cinnamon rolls. The egg-replacer did make them more gummy which was unfortunate, but I still really enjoyed them. I still would highly recommend them if you are looking for something new.  I froze some and reheated them. I don't think it changed them that much. The second day they definitely weren't as good as when they were fresh.

2. Gluten free Sausage and Cheddar biscuits here. I skipped the sausage and used 6 slices of crumbled bacon instead. (Farmland brand). For cheddar I used "Daiya" non-dairy cheddar cheese.  I used palm shortening, as well. Oh, wow. They were so flaky and delicious. They were even almost as good the next day. I had to pack a lunch, and they were fantastic to take in a lunch bag.  I'm thinking these would be perfect on a long road trip. My husband who eats dairy and gluten really enjoyed them, too. I was so glad I made them and can't wait to make them again.

Saturday, April 26, 2014

Allergy-friendly Chocolate Coconut Cups

This recipe was found here. Could they look any more delicious? I don't think so. I was just noticing how many  dessert recipes I have on this blog. Hmmm. . . .someone has a sweet tooth, apparently. 


Chocolate Coconut Cups {Gluten and Dairy Free}

8-9 oz of dark chocolate
1/2 cup coconut oil
1/4 cup dry unsweetened coconut flakes
1 tsp coconut extract
1 tbsp sugar (optional) I will leave this out.
Raw almonds (optional) I will leave this out, too. 

In a mini muffin tin, place 12 mini cupcake liners.  Melt the dark chocolate in the microwave for 1 minute and then in 30 second increments after that, making sure you stir the chocolate after each time until it is completely melted.  Place about 1 teaspoon of chocolate in each liner and coat well.  Place in the refrigerator to harden.  In a small bowl, mix together the coconut oil, dry unsweetened coconut flakes and coconut extract.  (You may want to add about a tablespoon of sugar if you like it a little sweeter or using sweetened flaked coconut is another option!)  Add one tablespoon of the coconut mixture to each liner and then cover with another spoonful of melted chocolate.  If you want to add an almond do so before you add the final spoonful of melted chocolate!   Let harden in the refrigerator for 5-10 minutes.  Enjoy!

Monday, March 17, 2014

Gluten-free, Dairy-free, Soy-free Sugar-free APPLE CRISP


1 cup Brown Rice flour mix (the ratio is 1 cup brown rice flour to 2/3 c. potato starch to 1/3 c. tapioca starch)
3/4 cup granulated maple sugar
2/3 cup GF granola (see recipe on my blog here. I make it without nuts,fruit or cinnamon)
1 tsp cinnamon
1/2 tsp xanthan gum
1/2 tsp tsp salt
6 cups thinly sliced apples or pears (I use one apple and 2 pears)
1/3 cup grapeseed oil

1. Preheat oven to 350F. Position rack in center of oven. Lightly grease 9 inch round cake pan with oil.

Combine flour, sugar, cinnamon, xanthan gum, and salt in a small bowl. Add oil and mix until crumbly. Add more if needed.
Place apples in cake pan, drizzle with maple syrup and toss.  Sprinkle the top with the flour mixture.

Place the pan in the center of the oven and bake about 40 minutes or until the apples are tender and the topping is golden in color. Serve warm. (photo not mine, but looks very similar!)

If you want to make it without granola, you can add 1 and 1/4 tsp GF baking powder, 1 egg (or egg replacer) and then just drizzle with oil, or add as needed to make it crumbly.

What's your favorite dessert recipe? Leave me a comment or write me at hdickinson2003@gmail.com

Thursday, November 22, 2012

Sugar Conversion Chart for Stevia


Ever wish you had a conversion chart from Stevia to Sugar and Sugar to Stevia? Go here for a wonderful easy to read chart that will lay it out for you!

Wednesday, September 26, 2012

Paleo Lemon Dream Cake

photo from fresh4five
If you can have eggs, this cake here would be extraordinary! It's even sugar free. I would try to make it without the eggs, and would thicken it with cornstarch. I'd love to know if anyone makes it. This will be on my list of delights for a party!

Paleo Meyer Lemon DreamCake

Crust
1-1/2 cups ground raw Sunflower seeds
½ cup ground raw pumpkin seeds
1 cup coconut flakes
½ cup coconut sugar
1/3 cup Coconut Oil , liquefied

Preheat oven to 350F
Line Springform Panwith parchment paper (bottom)

Place all ingredients in a bowl and using a fork mix together until large crumbs form.

Press firmly and evenly in the bottom of the pan

Bake for about 12 minutes, until lightly golden; melt sugar to help harden the crust.
Set aside to cool

Vanilla *Cheesecake* Layer
500g bag of frozen cauliflower cooked until tender
1 cup coconut butter (not oil, you want the butter)
½ cup pure maple syrup
½ tsp ground vanilla beans

Place all ingredients in your food processor with the S blade attachment. Blend until smooth.

Now line the sides of the spring form pan with parchment paper.

Pour the vanilla mixture into the pan and spread evenly and smoothly on top of the crust. Place in the fridge to cool and set slightly

Lemon Curd
(This recipe is adapted slightly from my dairy free lemon curd recipe so it becomes slightly thicker, for stability on the cake)

6 egg yolk
½ cup fresh squeezed Meyer lemon juice
1-1/2 tbsp Meyer lemon zest
½ cup pure maple syrup
2tbsp coconut oil
4 tbsp coconut butter
2 tbsp tapioca flour

In a glass or stainless steel mixing bowl (that fits in a pot as a double boiler – or your
double boiler if you have one) whisk egg yolks, lemon juice, zest and maple syrup.

Place on top of simmering water and whisk constantly for 10-12 minutes until a thick and fluffy mixture forms. Remove from heat.

Now add the coconut oil, and butter and whisk to combine. Now add the tapioca flour one tbsp at a time. Set in the fridge to cool slightly.

Pour the Meyer Lemon curd on top of the Vanilla layer in the spring form pan and allow it to set in the fridge for several hours (I left it over night)

Remove the cake form and parchment paper. Using a damp pallet knife you can smooth the outside edges if you desire.

Enjoy

Friday, August 17, 2012

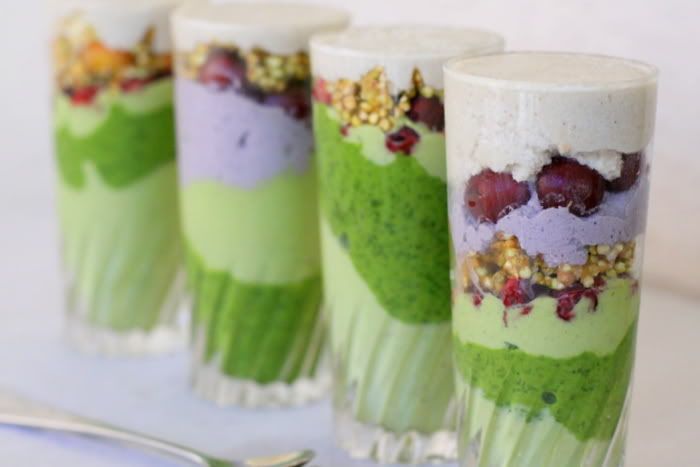
Green Mountain Parfait

G0lubka.blogspot.com has these amazing looking treats. They are healthy, and nutritious! They look so splendid I think these would be worthy of a party or a fancy dinner!Go here for the recipe, as well as many other recipes to tantalize your taste buds!
photo from G0lubka.blogspot.com

Light Green Layer - Avocado Ice Cream
3 hass avocados
1 cup meat of fresh young coconut OR cashews
1/4 cup coconut oil
juice and zest of 1 1/2 limes
5 dates - pitted
1/2 vanilla bean
1/3 cup light raw agave nectar
1 cup water

Combine all ingredients, except the lime zest, in a high speed blender until smooth. Reserve 1/3 of the mixture for the forest green layer. Chill well and put into an ice cream maker for 25 minutes or however long your brand of ice cream machine suggests. Add the lime zest directly into the ice cream machine after about 15 minutes of churning. Freeze for 1-2 hours before serving.

If you don't have an ice cream maker, there is an option to make avocado mousse instead of ice-cream. Just exclude the water and coconut meat/cashew, add about two more avocados and adjust the amount of agave to taste. Chill in the refrigerator until the mousse thickens.

Forest Green Layer
In a high speed blender, combine the reserved 1/3 of avocado mixture with some fresh spinach until the desired colour is achieved. Make ice cream according to the instructions above.

White Layer - Vanilla Cream
1 cup meat of young Thai coconut
1/4 cup coconut water
1/4 cup coconut oil
1/2 vanilla bean
1/4 cup light raw agave nectar
1/2 cup dry coconut flakes OR cashews

Combine all the ingredients in a high speed blender until smooth. Reserve about 1/3 of the mixture for the Violet Layer. Chill in the refrigerator until the cream thickens.

Violet Layer - Blueberry Cream
In a high speed blender, add fresh blueberries or blueberry powder to the reserved 1/3 of vanilla cream until the desired colour is reached. Chill in the refrigerator until the cream thickens.

Mango Buckwheat Crunchies
1 cup sprouted buckwheat
flesh of 1/2 ripe mango
2 dates - pitted

In a blender, puree the mango flesh and dates. Transfer to a mixing bowl together with the sprouted buckwheat and mix well to coat the sprouts.
Spread on Teflex sheets and dehydrate overnight or until completely dry and crispy.

Assembly
1-2 cups fresh cherries - pitted
1 cup fresh or freeze dried sour cherries (optional) - pitted

Cut the fresh cherries in half. Optionally, dehydrate the fresh cherries at 115F for 1-2 hours.
Using a piping or Ziploc bag, squeeze some avocado ice cream into a tall glass to make a first layer. Follow by the forest green layer, and then more avocado ice cream mixed with cherries. Sprinkle with mango buckwheat crunchies and top with blueberry and vanilla cream. You can arrange the layers in any way you want. Aesthetically, it's nice to take care to arrange the layers unevenly to create the hilly landscape appearance.

Thursday, July 26, 2012

Quinoa with Kale, Raisins and Chickpeas


I stumbled upon this recipe here at veggienook.com. I love the colors and feel healthy just thinking about eating it, (kind of like certain recipes make me feel like my arteries are clogging just by looking at them). 
photo from theveggienook.com

Quinoa with Kale, Raisins and Chickpeas (Vegan, Gluten-free, Sugar-free)
Serves 4.
  • 2/3 cup dry quinoa, rinsed well
  • 1 1/3 cup vegetable broth or vegetable bouillon and water to equal 1 1/3 cups
  • 4 cups packed kale, torn into bite-sized pieces
  • 1 tsp coconut oil
  • 1 clove garlic, minced
  • 1/4 tsp chilli flakes
  • one 19 oz. can chickpeas, drained and rinsed well
  • zest of 1 lemon
  • 1/4 cup raisins, roughly chopped
  • 1/4 tsp good quality sea salt
  • 1/2 cup halved cherry tomatoes
  • nutritional yeast and chopped walnuts for serving (optional)
Place the quinoa and broth in a large pot, bring to a boil then cover and reduce to a simmer until almost all the liquid has been absorbed. In the last couple minutes add the kale on top and give a quick stir. Cover and let cook for 2 more minutes. Set aside.
While waiting for the quinoa to cook heat a large pan over medium heat. Add the coconut oil and once hot add the garlic and chilli flakes. Sauté until starting to brown and are fragrant (a couple minutes. Add the chickpeas and lemon zest and cook until warm, about 2 min. Add the quinoa, kale, raisins and salt and stir to mix well. Add the cherry tomatoes last stir over the heat for 1 minute. Serve with some nutritional yeast and chopped walnuts sprinkled on top.
This dish is best eaten the day made, although is good as leftovers as well. If you are planning on saving some for a later date, I suggest sprinkling it with some lemon juice and maybe a drizzle of olive oil before serving.

Friday, July 6, 2012

Chocolate Kiwi Pops

Get a load of these pops here! I think they would be perfect for summer.
photo from showfoodchef


Chocolate Kiwi Pops
  • Kiwi
  • 1 cup dark chocolate
  • 1/2 cup coconut oil
  • Popsicle sticks

Peel and cut kiwi into 1 inch thick rounds, with a Popsicle stick into each round. Freeze them on a tray in the freezer. (This is a must do step.)
Then, melt 1 cup dark chocolate and 1/2 cup coconut oil over a double boiler. (You can make your own using a bowl on your stove over boiling water.) Once melted, cool the chocolate to room temperature.
Dip each frozen kiwi pop in the chocolate. It should harden right away. Place on trays to refreeze until eating or eat immediately . (I’ll take the second choice, please.)
I’m going to try this with bananas–yum!
Thanks, Showfood Chef for the recipe and photo.