Showing posts with label dessert. Show all posts

Saturday, November 9, 2019

{Gluten and Dairy Free} Chocolate Raspberry Crumb Bars


I used to love these bars before I changed my diet. They were unbelievable. I was craving them awhile ago and decided to change this recipe to make it allergy-friendly. It was a sweet success. They were one of the yummiest desserts I've had in as long as I can remember. It is by no means sugar free, but worth the splurge if you can tolerate it. I gave one of these to my sister-in-law whom can eat anything and she was amazed that these are gluten and dairy free. This would be great for company, or to bring to a party or potluck. I am posting this at Allergy-free Wednesdays.

Ingredients

  • 1 cup palm shortening or Earth's Balance
  • 1 and 1/2 cup brown rice flour
  • 1 and 1/4 cup tapioca or potato starch
  • 2 tsp xanthan gum
  • 1/2 cup packed light brown sugar
  • 1/4 teaspoon salt
  • 2 cups (12-ounce package)Enjoy Life Chocolate Chips
  • 1 can (13.5 ounces)Coconut Milk
  • 1/3 cup seedless raspberry jam

Directions

PREHEAT oven to 350° F. Grease 13 x 9-inch baking pan.
Beat oil flours,xanthan gum,  sugar and salt until crumbly. If it's not crumbly add a little more brown rice flour until it is. With floured fingers, press 1 3/4 cups crumb mixture onto bottom of prepared baking pan; reserve remaining mixture.

BAKE for 10 to 12 minutes or until edges are golden brown.

MICROWAVE 1 cup morsels and coconut milk in medium, uncovered, microwave-safe bowl on HIGH (100%) power for 1 minute;STIR. Morsels may retain some of their original shape. If necessary, microwave at additional 10- to 15-second intervals, stirring just until morsels are melted. Spread over hot crust.

SPRINKLE crumb mixture over chocolate filling. Drop teaspoonfuls of raspberry jam over crumb mixture. Sprinkle with remaining morsels.

BAKE for 25 to 30 minutes or until center is set. Cool completely in pan on wire rack.

Monday, January 16, 2017

Make Your Own {Gluten, Dairy and Grain Free} Hostess Cupcakes


Just thinking about hostess cupcakes brings back warm memories. I love that she came up with this great alternative at Cassidy Cravable Creations. Since I can't have eggs, I will use this coconut whipped cream here instead for the filling. I want to make these for my kids' birthdays. Below is a great tip she had. The photos are hers from Cassidy Cravable Creations.
Back to school tip:
When the kids are in school I try to always keep some frozen cupcakes (& pizza!) in my freezer at all times for that last minute party. I made 24 of these bad boys so I could stock up for awhile.


Cupcakes: (Click here for step-by-step pictures)
  • 1/2 C Coconut Flour, sifted
  • 1/2 C Arrowroot Flour
  • 1 Tsp. Baking Soda
  • 1/2 Tsp. Sea Salt
  • 1/2 Tsp. Cinnamon, heaping
  • 1/2 C Cocoa
  • 1 C Water
  • 5 Eggs
  • 1 Tbsp. Gluten Free Vanilla
  • 2/3 C Earth Balance Butter
  • 1 1/3 C Granulated Sugar (I used sifted coconut palm sugar)
Filling
  • 6 Egg Whites 
  • 1 C Honey or Agave
  • 1 Tsp. Pure Vanilla
  • Pinch of Salt
Chocolate Ganache
  • 1/2 C SO Delicious Coconut Creamer, original
  • 1 C Dairy Free Mini (or finely chopped) Chocolate Chips
  • 1/2 Tsp. Pure Vanilla, optional
Cupcakes:

1. Preheat oven to 375 degrees.

2. Bring the water to a boil. Stir in the cocoa until melted then set aside and allow to come to room temperature.

3. In a large bowl, whisk together the coconut flour, arrowroot, salt, cinnamon, and soda. Set aside.

4. Beat together the butter and sugar.

5. Beat in the eggs, one at a time, then the vanilla. Scrape down the bowl as necessary.

6. Add the flour mixture and beat until incorporated. Again, scrape down the bowl as necessary.

7. Add the cocoa mixture and beat until smooth. Batter will be thin.

8. Line a muffin tin with baking cups or spray each cup with cooking spray. Fill each cup almost full. Makes 12 - 15 cupcakes. Bake 17 - 20 minutes.

9. Cool completely on a cooling rack.

Filling:

1. Place egg whites, honey, and salt in a heatproof bowl.

2. Place the bowl over a small saucepan of water, being sure that the bottom of the bowl doesn't touch the water.

3. Bring to simmer over medium-low heat. Stir mixture constantly until you feel the heat coming from the eggs if you place your hand over them and the consistency becomes thinner, about 7 minutes. Don't crank up the heat or the eggs will curdle and you'll have to run it through a fine mesh strainer, so be patient!

4. Remove from heat. Stir in the vanilla. Beat on high until mixture becomes thick and cool, about 5 - 8 minutes. 

To Fill:

1. After the cupcakes have cooled, use a knife to cut a cone shape out of the center of the cupcake.


2. Fill with the frosting. I used a pastry bag, but you can use a plastic baggie, push the filling in the corner, then snip the corner off.


3. Cut the bottom part of the cone off. Then place the top part of the cone, the lid, on top of the filling.

Make The Chocolate Ganache:

1. Place the chocolate chips in a medium bowl. Make sure they are finely chopped or they will not melt.

2. Bring the coconut creamer to a rolling boil. Pour over the chocolate chips, add the vanilla, and stir until completely melted. 

3. Dip each cupcake in the ganache and set aside to cool completely. Place in fridge to cool faster if you're in a hurry. 

4. Optional: Repeat step 3 and dip each cupcake in the ganache again so the top will be super smooth. As you can tell, I did not do this step :)

Piping:


1. Use the remaining filling to pipe a cute design on the top.


Monday, December 5, 2016

{Gluten and Dairy Free} Chocolate Raspberry Bark

What is a better way to make someone's day than to give them some of these beauties from Premeditated Leftovers. I think these would be gorgeous for baby showers, dessert, when friends come over, or to give for Christmas treats.
photo from premditatedleftovers.com


Ingredients
  • 10 -16 ounces dark chocolate
  • 6 - 8 ounces raspberries
Instructions
  1. Place a piece of parchment paper or foil on a flat tray.
  2. Rub cookie cutters with oil.
  3. Melt chocolate according to package directions.
  4. Pour or spoon chocolate into cookie cutters (1 - 2 ounces per cookie cutter) reserving some for the topping.
  5. Place raspberries upside down into the chocolate while it is still soft.
  6. Chill for 30 - 60 minutes, until it solid enough to be removed from cookie cutters.
  7. Drizzle remaining chocolate over the tops of the raspberries.
  8. Chill in the refrigerator for another 30 - 60 minutes.
  9. Store leftovers in the refrigerator.

Wednesday, September 7, 2016

What's for Breakfast? Fabulous "Penny's Apple-Brown Sugar Coffee Cake"


Can I just say this is one of the best things I've had since going off of gluten, dairy, soy and eggs? My husband made this for me this morning, and boy did he score some points!  This is adapted from my new cookbook "Cooking for Isaiah" by the chief editor for Rachel Ray (see it on the sidebar of my blog). This is something I am going to start bringing to brunch potlucks. Watch out!

Here  it is!
Serves: 8. Prep Time: 10 minutes.  Cook Time: 45 minutes

1 cup GF flour plus 2 tsp(we doubled it and used this ratio. 1 cup brown rice to 2/3 cup potato starch to 1/3 cup tapioca starch. You'll be glad you doubled it!!)
2 tsp GF baking powder
1/4 tsp salt
1 tsp xanthan gum

3/4 cup packed light brown sugar (we used maple granulated and divided into two for the two parts)
1/4 cup mini chocolate chips (we used "Enjoy Life" chocolate chips) These could be left out if you want it sugar free.
1/2 cup chopped walnuts (we omitted these)
1 tsp ground cinnamon
2 large eggs at room temperature (we used Ener-G egg replacer)
1/2 cup granulated sugar (to avoid it being too sweet since I don't eat a lot of sugar and find things sweet, we omitted this)
1/2 cup vegetable oil like grapeseed oil
2 tsp vanilla extract (we used GF Costco brand)
2 large apples -peeled, cored and cut into 1/2 inch pieces


  1. Preheat the oven to 375F. Lightly grease a 9 inch springform pan or a round cake pan. In a large bowl, whisk together 1 cup flour, the baking powder and salt.
  2. In a small, bowl, toss together the remaining 2 tsp flour, 1/2 cup brown sugar (or half of the total of maple), chocolate chips, walnuts (if you wish) and cinnamon.
  3. In another small bowl, whisk together the eggs,granulated sugar and remaining 1/4 cup brown sugar (or the second half of the maple sugar) until smooth. Whisk in the oil and vanilla. Stir into the flour mixture until just combined. Pour half the batter into the prepared pan, and top with half the apples and half the chocolate chip mixture; repeat with the remaining batter, apples and chocolate chip mixture. Bake the cake until the toothpick inserted in the center comes out clean, about 45 minutes. Let cool in the pan and set on a wire rack. NOTE: I find the key in baking, especially GF is to not over cook it. I check it a few minutes before they say it is done and keep a close eye on it. This helps ensure it is moist, which can make the difference between a fantastic dessert and one that disappoints.  Another note if you are just starting baking GF.. .the batter when baking GF will be weird compared to wheat baking. I can't count how many times I've smeared batter in a pan and wondered if it would ever turn out. I've got so I just assume it's going to look weird and trust that "weird" batter just goes with the territory.


Saturday, May 21, 2016

How to Make the Perfect {Gluten Free} Pie Crust

Serious Eats has this amazing tutorial on the mystery otherwise known as "how to make a believable gluten free pie crust". I loved that she even has a dairy free option. I learned a lot and think you may, too! Go here for the tips.
photo from Serious Eats

Monday, March 7, 2016

Dairy Free Triple Chocolate Pudding


This should be called "Triple Death Chocolate Pudding". It's amazing. I think I usually don't use the chocolate chips, but it's still enough to make my mouth water just typing this.  It comes from the book "Go Dairy Free" by Alisa Marie Fleming

3/4 cup granulated sugar (or granulated maple sugar)
1/3 cup unsweetened cocoa powder
1/4 cup + 2 TBS Corn Starch
Pinch salt
3 cups cold milk alternative (rice, hemp, soy, almond)
1/4 cup semi-sweet chocolate chips (I choose Enjoy Life)
1 tsp vanilla extract


In a large pot, whisk together the sugar, cocoa, cornstarch and salt. Add the milk alternative, whisking until smooth. Bring the mixture to a boil over medium heat, whisking continuously. Lower the heat and simmer gently, whisking continuously, for 5 to 10 minutes or until the pudding is thick. Remove the saucepan from the heat and stir in the chocolate chips and vanilla. Serve the pudding warm, or scoop into a bowl, press a piece of plastic wrap onto the surface of the pudding (to prevent a skin from forming), and refrigerate until ready to serve.

Gooey Smores Blondies {Vegan and Gluten Free!}

Tessa Domestic Diva concocted this amazing version of smores. I would use Kinnikinnick Smoreables for the graham crackers.
photo from Tess the Domestic Diva

Gooey S'Mores Blondies - Gluten Free & Vegan
Author: 
Prep time:  
Cook time:  
Total time:  
Serves: 16
Ingredients
  • ½ cup palm shortening, coconut oil, or favorite butter (vegan or otherwise)
  • ⅔ cup coconut palm sugar or brown sugar
  • 2 teaspoons chia or flax meal gelled w/ 3 tablespoons hot water (or one egg)
  • 2 teaspoons vanilla extract
  • ¼ teaspoon sea salt
  • ½ teaspoon baking powder
  • ¼ teaspoon baking soda (leave out if using an egg)
  • ⅔ cup (sprouted) brown rice flour (I use Planet Rice)
  • ⅓ cup tapioca flour (or other starch)
  • 1 cup mini marshmallows
  • 1 cup gluten free graham cracker crumbles (optional)
  • ¾ cup dark chocolate chips
Instructions
  1. Preheat the oven to 350 degrees, grease an 8 x 8 pan (or line with parchment).
  2. In the bowl of a mixer, beat the palm shortening through the vanilla until smooth and creamy.
  3. With the mixer still running on medium low speed, sprinkle in the salt, guar gum, baking powder, and baking soda.
  4. Continue with the flours.
  5. Mix in the chocolate chips, graham crackers, and marshmallows.
  6. Spread into the prepared pan to make more or less even.
  7. Bake for 25-30 minutes until set in the middle.
  8. Let cool completely to firm up!

Monday, November 30, 2015

Dairy Free Grasshopper Pie


I think this is a super yummy recipe I found at The Unrefined Kitchen. Since I can't have almonds I was thinking about using GF brownies (probably the mix from trader joes) instead. You can spread a thin layer on the bottom and bake until crunchy. I also love to use Glutino "oreos" that I put in a food processor with a little oil and blend. Then you just pat that down in your pie pan. You can buy mint ice cream, or instead, here is her recipe for her version. 
photo from The Unrefined Kitchen


Ingredients:
2-3 cups prepared Mint-Chocolate Chip Ice Cream (we used 3 cups, but this is more than one recipe of the ice cream…)
3/4 cup almond flour
3/4 cup almonds, finely chopped
1/4 tsp. salt
1/4 cup raw honey
3 Tbsp. coconut oil, melted (or butter)
3 Tbsp. cocoa or cacao
Coconut Whipped Cream and/or melted chocolate chips for garnish
Directions:
1. Preheat oven to 325 degrees.
2. Combine almond flour, almonds, salt, honey, butter and cocoa in a bowl.
3. Press into a 9″ pie plate.
4. Bake at 325 degrees for 10-12 minutes.
5. Cool completely and place in freezer.
6. If your ice cream is already prepared and in the freezer, let it stand at room temperature until you can scoop and spread it fairly easily. Fill frozen pie shell with softened ice cream and place back into freezer to firm up. (If you prepare your ice cream after making the crust, you can pour it right into the crust from the ice cream maker.)
7. (Optional) Decorate pie with prepared coconut whipped cream and/or melted chocolate. Place back in the freezer until ready to serve! Remove pie from freezer for a few minutes before cutting and serving.
*I have only made this recipe once, and even though we loved it, we did have a bit of trouble with the crust coming apart from the ice cream section…if anyone has any tips that would help that, let me know!

Thursday, October 29, 2015

{Gluten and Dairy Free} Rice Crispy Treats

These are my go-to for an easy dessert. They taste like the real deal, so they are perfect for potlucks or other places where people can eat gluten and dairy (lucky dogs).
  • 3 tablespoons grape seed oil 
  • 1 package (10 oz., about 40) regular marshmallows (Kraft is dairy and gluten free)
  • - OR -
  • 4 cups miniature marshmallows
  • 6 cups Gluten Free Rice Crispy Cereal (I use Erewhorn) Here


1. In large saucepan heat grape seed oil over low heat. Add marshmallows and stir until completely melted. Remove from heat. 

2. Add Gluten free crispy rice cereal. Stir until well coated.

3. Using oiled spatula or wax paper evenly press mixture into 13 x 9 x 2-inch pan coated with cooking spray. Cool. Cut into 2-inch squares. Best if served the same day.


MICROWAVE DIRECTIONS:
In microwave-safe bowl heat oil and marshmallows on HIGH for 3 minutes, stirring after 2 minutes. Stir until smooth. Follow steps 2 and 3 above. Microwave cooking times may vary.


Monday, September 21, 2015

Amazing Non-dairy Ice Cream in Seattle

One day I googled the words "vegan ice cream seattle" and my life soon became way more amazing. I discovered a little hole in the wall ice cream shop that makes ice cream out of coconut milk. They have dairy ice cream flavors and then vegan ice cream flavors. This works out well because my kids and I have four flavors of vegan ice cream to choose from, and my husband can have dairy ice cream at the same time. Some vegan flavors are maple, ube ( a filipino `sweet potato), chocolate chip cookie dough (gluten free), pina colada sorbet, blackberry sorbet, chocolate mint, and cinnamon chocolate. It is so creamy, and reminds me of soft serve at Dairy Queen except with unique flavors. The dairy ice cream is also home mixed with interesting flavors like Thai Tea and Mango Chili. The most amazing part is the cost. The kid's size is just about equal to two scoops at Baskin Robbins. It costs $2.50 with a sugar cone. The adult serving is two of these large servings together. We're talking a crazy amount of ice cream. And it's only $3.50. If you are able to eat gluten you can even have a homemade waffled cone for $0.50 more. To find out locations in Ballard and the U-district head over here! 

Monday, July 13, 2015

Review of Trader Joes Gluten Free Brownies

I love me some Trader Joes. I decided to give you my two cents about their chocolate brownies. These brownies are gluten free, soy free, dairy free, egg free (if you use egg replacer), and nut free. They are not sugar free.  I found them delicious, but a bit greasy. My suggestion would be subbing half of the oil for unsweetened applesauce. I have done this with regular cake mixes for my kids and they actually turn out more moist than normal.  All you do is add 3 ingredients and throw them in the oven. I saw one person who reviewed these and didn't like them. Someone else served them to  people who do not eat gluten free and they didn't even notice. I'd say, for something this easy, I wouldn't complain. But if I wanted something a little more like the real deal, I'd probably make one from a cookbook I trust. For a quick treat, these definitely get the job done.

We served it with coconut whipped cream (see my blog here for directions), bananas, and strawberry sauce. The combo was amazing.

Sunday, October 12, 2014

My Secret for Dairy-free Frosting

When I make frosting I use Earth's Balance non-dairy spread (they have a soy free one now, too!) or Spectrum palm shortening (sometimes half EB and half PS) with rice milk, vanilla  and powdered sugar. I use ratios just like in normal frosting. However,  I have found the biggest secret with the frosting is adding enough powdered sugar to keep it thick and not runny. If it's just even a bit too much on the liquid side of things it turns runny later. I've found that if I add  just enough powdered sugar to make it quite stiff, you can't even tell that it's dairy free. It's thick enough for decorating even. The secret is putting in more powdered sugar and making it "thicker" than you might normally think. (but keep it spreadable!) Err on the side of too much powdered sugar as opposed to, too much rice milk.  If you want sugar free frosting go to the chocolate cake recipe to see how it's done.

Here is an example of the ratios from allrecipes.com

  • 4 cups confectioners' sugar
  • 1/2 cup Spectrum Palm shortening
  • 5 tablespoons rice milkmilk
  • 1 teaspoon vanilla extract

Tuesday, September 23, 2014

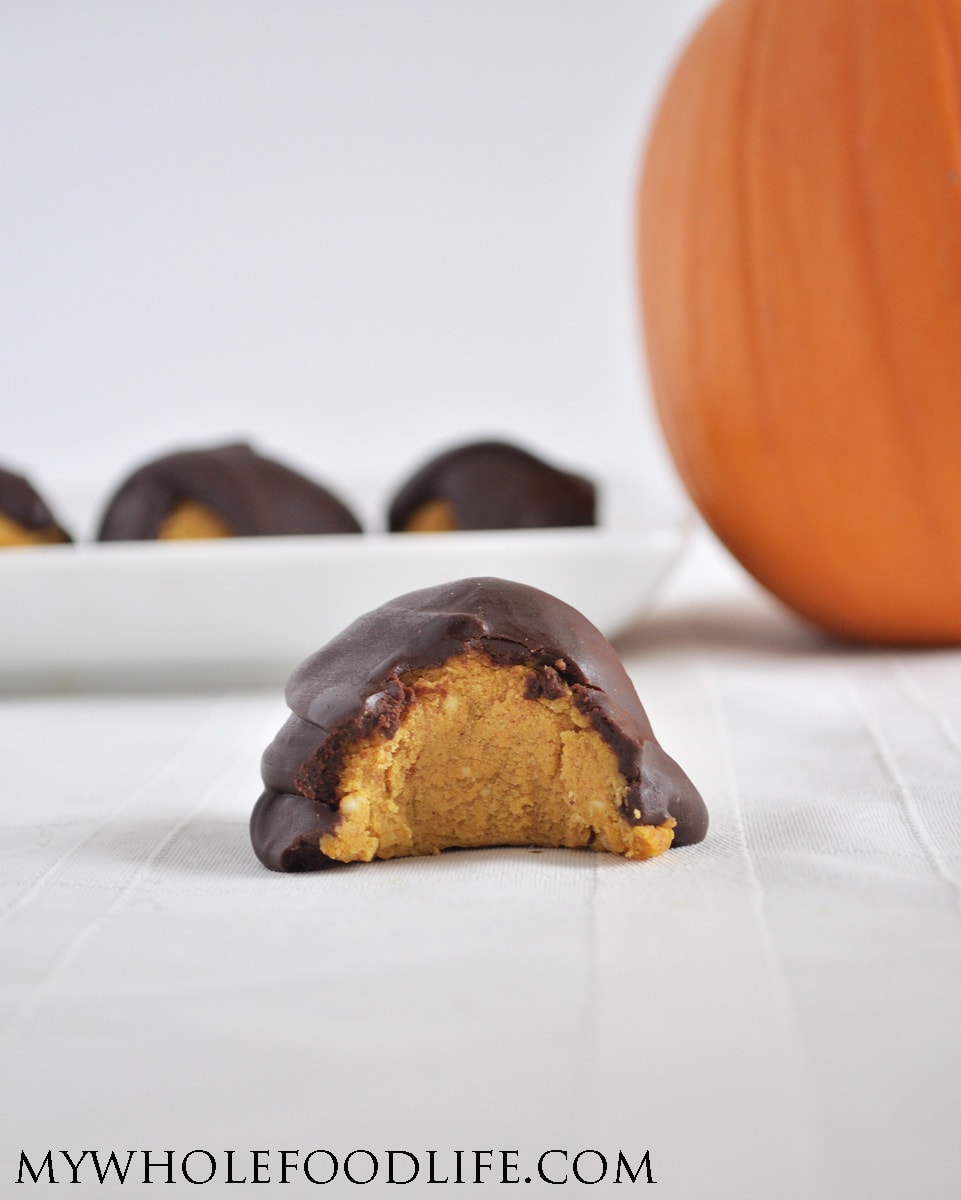
{Gluten and Dairy Free}Pumpkin Truffle

My Whole Food Life concocted this fun Pumpkin Truffle recipe. She used Almond milk, but I switched it to Coconut milk. I bet you could do hemp or any other rich milk.  Enjoy!
photo (as noted) from My Whole Food Life

Ingredients
Instructions
  • In the food processor, combine all the ingredients for the pumpkin cream. Blend until smooth.
  • Stick the food processor bowl in the fridge to firm up a little. About 10 minutes.
  • Using a cookie scoop, drop mixture onto a lined baking sheet.
  • Place the baking sheet in the freezer to firm while you make the chocolate mixture.
  • To make the chocolate use a double boiler method. Fill a saucepan with water and bring it to a boil.
  • Place a glass bowl on top of the pot with the water. Add the chocolate chips and almond milk to the glass bowl and gently melt the chocolate.
  • Once all the chocolate is melted, use a spoon to drizzle the chocolate over each truffle.
  • Place in the fridge to firm up the chocolate.
Please keep these truffles in the fridge. They should last a couple weeks. You can freeze them for longer storage. Enjoy!

Read more at http://mywholefoodlife.com/2014/09/14/pumpkin-truffles/#LrMsMfTFRROy1QV5.99

Monday, September 8, 2014

Raw Chocolate Pie

Oh, my this looks delicious! www.nourishingmeals.com ,one of my favorite blogs, put out this recipe. Go here to see more. You will love what they have to offer! I would use sunbutter instead of the cashew butter. It will make it taste like a chocolaty-peanut buttery pie.
Raw Chocolate Pie

Crust:
2 cups pecans
8 to 10 medjool dates, pitted
1 tablespoon virgin coconut oil
1 tablespoon cinnamon
1 pinch ground cardamom (optional)

Filling:
1 cup raw cashew butter
1 small avocado
½ cup + 2 tablespoons GF cocoa powder (Dagoba is GF)
½ cup raw agave nectar
½ cup barely melted coconut butter*
¼ cup water
1 tablespoon non-alcoholic vanilla

Place nuts into food processor and pulse until finely ground. Add remaining ingredients for crust and pulse until thoroughly ground and mixed. Press crust into the bottom of a 9.5-inch deep dish pie plate. Place into refrigerator to chill.

Place all ingredients for filling into food processor and process until smooth and creamy. Add a little more water for a thinner filling, one tablespoon at a time. (It will take longer to set if you do this). Note: if you do not like a strong chocolate flavor then start with less cocoa powder and gradually add more as your taste suggests.

Pour chocolate filling into pie plate. Spread out evenly with a rubber spatula and place back into the refrigerator to chill. Chill for 3 to 4 hours. Slice and serve with fresh berries if desired.

*Be sure to just barely warm the coconut butter on very low heat, it will quickly burn otherwise. Also, this is coconut butter, not coconut oil. Coconut butter is made from the whole coconut, flesh and oil.

Raspberry Sauce

½ cup water
2 tablespoons arrowroot powder
¼ cup agave nectar
1 cup fresh or frozen raspberries
1 to 2 teaspoon vanilla


Place the water and arrowroot into a small saucepan and stir to dissolve the arrowroot. Add the agave nectar and raspberries and heat over medium heat. Simmer until the sauce is translucent and the raspberries have broken down. I use a wire whisk to help with this. Turn off heat and stir in vanilla. Let cool to room temperature before serving.

Thursday, June 12, 2014

Allergy-friendly Chocolate Chip Cookie Dough Ice Cream

You heard me. Cookie dough ice cream. I was hankering this the other day. I have taken it from Annalise G Roberts cookbook on the side bar called "Gluten Free Baking Classics". I will include her original and then put in some changes I made. You can make half the dough into balls, freeze them and then add to TEMPT vanilla ice cream. This was my all time favorite dessert before going off foods that bothered me. I welcome it back like an old friend.

1 cup vegetable shortening (not butter or margarine) * I used Spectrum palm shortening
1 cup granulated sugar (you can use 1/2 cup pure maple syrup in liquid form and 1/2 cup xylitol instead of both sugars)
1/2 cup dark brown sugar
2 large eggs (I used egg replacer)
1 TBS pure vanilla extract (I used GF Costco brand)
2 cups plus 2 TBS Brown Rice Flour mix (the ratio is 1 cup brown rice flour to 2/3 cup potato starch to 1/3 cup tapioca starch) * I added one more TBS to balance out the liquid from using maple syrup
1 and 1/2 tsp baking soda
1 tsp xanthan gum
1/2 tsp salt
12 oz chocolate chips (I use "Enjoy Life")
1 cup nuts, optional (I didn't add these)


  1. Preheat oven to 375F. Position rack in the center of oven. Lightly grease cookie sheet with cooking spray. 
  2. Beat shortening and both sugars at medium speed in large bowl of electric mixer. Add eggs and vanilla; beat until fluffy.
  3. Add flour, baking soda, and xanthan gum, and salt; mix at medium speed until well blended. Mix in chocolate chips and nuts.
  4. Drop heaping teaspoons of dough onto cookie sheet 2 inches apart. Bake in center of oven for 8-10 minutes until light golden brown.  Transfer to wire rack to cool. Store in an airtight container
  5. Best when eaten within 3 days of baking. After 3 days store in the fridge. Can be kept in fridge up to two weeks or frozen up to one month. Unbaked dough can be kept in the fridge up to three days if sealed in a tight container or frozen up to one month. To freezer cover dough with plastic wrap and place inside tightly sealed plastic container so no air touches dough.


Saturday, April 26, 2014

Allergy-friendly Chocolate Coconut Cups

This recipe was found here. Could they look any more delicious? I don't think so. I was just noticing how many  dessert recipes I have on this blog. Hmmm. . . .someone has a sweet tooth, apparently. 


Chocolate Coconut Cups {Gluten and Dairy Free}

8-9 oz of dark chocolate
1/2 cup coconut oil
1/4 cup dry unsweetened coconut flakes
1 tsp coconut extract
1 tbsp sugar (optional) I will leave this out.
Raw almonds (optional) I will leave this out, too. 

In a mini muffin tin, place 12 mini cupcake liners.  Melt the dark chocolate in the microwave for 1 minute and then in 30 second increments after that, making sure you stir the chocolate after each time until it is completely melted.  Place about 1 teaspoon of chocolate in each liner and coat well.  Place in the refrigerator to harden.  In a small bowl, mix together the coconut oil, dry unsweetened coconut flakes and coconut extract.  (You may want to add about a tablespoon of sugar if you like it a little sweeter or using sweetened flaked coconut is another option!)  Add one tablespoon of the coconut mixture to each liner and then cover with another spoonful of melted chocolate.  If you want to add an almond do so before you add the final spoonful of melted chocolate!   Let harden in the refrigerator for 5-10 minutes.  Enjoy!

Monday, April 14, 2014

Sugar-Free Dairy-Free Chocolate Mousse

Get ready for a treat. I made this  into a pie with a crust of macadamias and dates (a handful of each pureed in the food processor, and then pressed in a pan). It was great. I really enjoyed it. I think that if I were to do it again I would try the version without the bananas.  It was good, but I prefer a fully chocolate pie. I love that it uses only natural sweeteners and is sugar free. Go here to see for yourself.

Monday, March 17, 2014

Gluten-free, Dairy-free, Soy-free Sugar-free APPLE CRISP


1 cup Brown Rice flour mix (the ratio is 1 cup brown rice flour to 2/3 c. potato starch to 1/3 c. tapioca starch)
3/4 cup granulated maple sugar
2/3 cup GF granola (see recipe on my blog here. I make it without nuts,fruit or cinnamon)
1 tsp cinnamon
1/2 tsp xanthan gum
1/2 tsp tsp salt
6 cups thinly sliced apples or pears (I use one apple and 2 pears)
1/3 cup grapeseed oil

1. Preheat oven to 350F. Position rack in center of oven. Lightly grease 9 inch round cake pan with oil.

Combine flour, sugar, cinnamon, xanthan gum, and salt in a small bowl. Add oil and mix until crumbly. Add more if needed.
Place apples in cake pan, drizzle with maple syrup and toss.  Sprinkle the top with the flour mixture.

Place the pan in the center of the oven and bake about 40 minutes or until the apples are tender and the topping is golden in color. Serve warm. (photo not mine, but looks very similar!)

If you want to make it without granola, you can add 1 and 1/4 tsp GF baking powder, 1 egg (or egg replacer) and then just drizzle with oil, or add as needed to make it crumbly.

What's your favorite dessert recipe? Leave me a comment or write me at hdickinson2003@gmail.com

Friday, March 14, 2014

Gluten Free Grasshopper Bars

For some extra festive St. Pattie's fun, why not try these gems? I would use egg replacer and this dairy free frosting. I was just thinking of trying a dairy free frosting with Daiya's cream "cheese".  If anyone tries these I'd love to hear about it. Go here for the recipe.
photo from BettyCrocker.com

Thursday, October 18, 2012

Soft Pumpkin Cookies

This time of year I'm thinking of pumpkin this and that. Pumpkin ice cream, pumpkin lattes and pumpkin cookies. Go here for Whole New Mom's great version.  I will either use macadamias for these or omit the nuts altogether. What is your favorite pumpkin treat?
photo from Whole New Mom


Soft Pumpkin Cookies (egg and dairy-free w gluten-free and sugar-free options)

Ingredients
Wet Ingredients:
1 c unsweetened pumpkin
1/2 c coconut oil, or other healthy fat, melted
1/4 c sweetener, either granulated or liquid
3-4 scoops stevia extract, or approx 4-8 T additional sweetener, to taste (For stevia, I recommend NuNaturals.  Add to either wets or dries.)
1 T orange flavoring or extract (Try Nielsen-Massey or Frontier Flavor.)
Dry Ingredients:
1 1/2 c gluten-free or regular flour
1 tsp baking soda (If you use flour with gluten, decrease to about 3/4 tsp)
1 tsp cinnamon 1/4 tsp salt (I recommend Real Salt)
1/2 chopped or ground nuts, optional (We used walnuts.  Almonds, macadamias, or even pumpkin or sunflower seeds would be great!)
Method
1.  Preheat oven to 375.  Combine pumpkin, oil, sweetener, and orange flavoring in a medium bowl.
2.  Add flour, baking soda, & seasonings.  Mix just ’til combined.
3.  Fold in nuts if using.
4.  Make spoonfuls or scoops with a 2 Tbsp muffin scoop.  If desired, roll in a bit of granulated sweetener before baking.  You get a really nice “punch” of sweetness without adding a lot of sweetener when you coat cookies rather than adding more to the batter. :-P .
5.  Place spoonfuls or scoops on a baking sheet (the scoops result in a cookie that really resembles the Enjoy Life ones :-) ).
6.  Bake 8 -10 minutes or until lightly browned.  They will harden a bit as they cool, but will still be nice and soft.

Notes:

1.  As I always say, with sweeteners, choose the healthiest one that you can.  If you aren’t on a sugar-restricted diet, use honey, sucanat, or maple syrup.  If you cannot have those, use vegetable glycerin, stevia, or yacon.  If you have no other alternatives, xylitol or erythritol will work, but you will need about 25% more sweetener if using erythritol.
If using a granulated sweetener, add 1T water.  Oh – and 1 scoop of stevia is a teensy amount – just 1/32nd tsp (this is for the pure extract.  If using pourable stevia, use 3-5 tsp, to taste.)
2.  Both the nut-filled and plain versions were great, but my boys and I much preferred the plain version (my husband simply loves nuts in just about anything.)
3.  Try whatever gluten free flour blend, or individual flour, that you have on hand.  Each will give the final cookies a bit of a different result, but they will be delicious! These are pretty forgiving little treats :-) !